Buttery Fresh Cherry Pie with Homemade Crust
- Time: 60 min active + 2 hours chilling
- Flavor/Texture Hook: Shattering, buttery crust with a tart, jammy center
- Perfect for: Family Sunday dinners or summer garden parties
- Fresh Cherry Pie with Homemade Crust
- The Precision Baking Key
- The Essential Pie Ingredients
- Tools for the Job
- Step by Step Baking
- Fixing Common Pie Issues
- Troubleshooting Common Issues
- Adjusting the Recipe Size
- Pie Baking Myths
- Storage and Reheating Tips
- Cherry Pie Flavor Twists
- Serving Your Fresh Pie
- Recipe FAQs
- 📝 Recipe Card
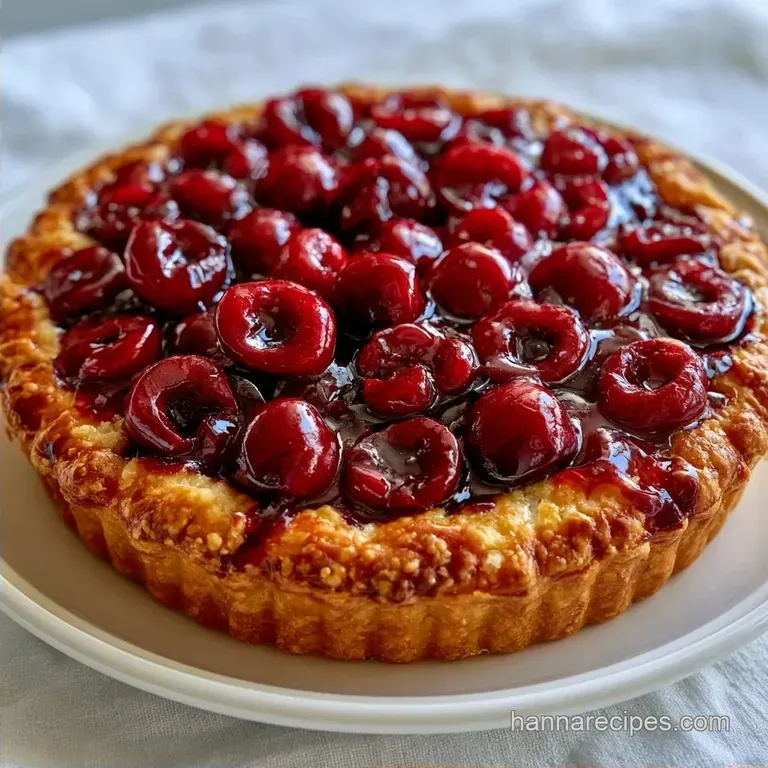
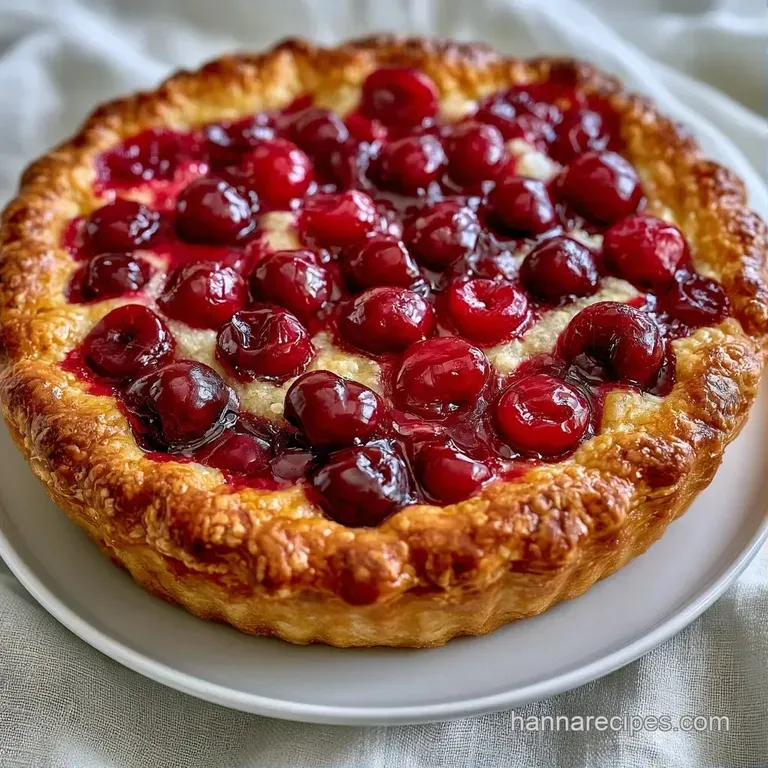
Fresh Cherry Pie with Homemade Crust
That loud, satisfying crack of a fork hitting a buttery crust is the only sound that matters here. I remember the first time I tried to make a fruit pie from scratch. I thought the crust just needed to be "mixed," so I over worked the dough until it was tough as a rubber tire.
I actually tried to cut it with a steak knife.
Forget everything you've heard about needing a professional pastry cutter or a chilled marble slab to get a flaky result. You don't need fancy gear to make a Fresh Cherry Pie with Homemade Crust. You just need to respect the temperature of your butter and stop mixing the moment the dough clumps.
We're going for a mahogany colored top and a filling that holds its shape on the plate. No runny puddles here. Trust me on this: the resting time for the filling is just as important as the chilling time for the dough.
The Precision Baking Key
Cold Butter: When tiny chunks of butter melt in the oven, they create steam pockets. These pockets push the flour apart, creating those distinct, flaky layers.
Cornstarch Hydration: Cornstarch needs a few minutes to bond with the cherry juices before it hits the heat. This ensures the filling sets into a jammy consistency rather than a soup.
Temperature Shifts: Starting at a high heat sets the crust's structure quickly. Dropping the temperature later allows the cherries to bubble and thicken without burning the edges.
According to King Arthur Baking, maintaining a cold environment for the dough is the single most important factor for a tender crust.
| Feature | Fresh Cherries | Canned/Frozen |
|---|---|---|
| Texture | Chunky and firm | Softer, more uniform |
| Flavor | Bright, high acidity | Sweeter, syrupy |
| Control | You adjust the sugar | Pre set sugar levels |
Precision Checkpoints:
- Butter Temp: Keep butter at 4°C (40°F) until the second it enters the processor.
- Dough Thickness: Roll the crust to a consistent 3mm thickness.
- Filling Rest: Let the mixture sit for exactly 15 minutes before pouring.
The Essential Pie Ingredients
For the Crust
- 2 ½ cups (315g) all purpose flour
- 1 tsp (6g) granulated sugar Why this? Adds a hint of sweetness and helps browning
- 1 tsp (6g) fine sea salt
- 1 cup (225g) unsalted butter, chilled and cubed Why this? High fat content creates the flakiness
- 6 8 tbsp (90 120ml) ice water
For the Filling
- 6 cups (approx. 900g) fresh cherries, pitted and halved Why this? Fresh fruit provides the best tartness
- ¾ cup (150g) granulated sugar
- ¼ cup (30g) cornstarch Why this? Essential for thickening the juices
- 1 tbsp (15ml) lemon juice
- 1 tsp (5g) vanilla extract
- ¼ tsp (1.5g) ground cinnamon
For the Golden Finish
- 1 tbsp (14g) unsalted butter, cubed (for dotting)
- 1 large egg
- 1 tbsp water
- 1 tbsp (12g) coarse sparkling sugar
| Ingredient | What It Does | Best Swap |
|---|---|---|
| All Purpose Flour | Provides structure | Pastry flour (more tender) |
| Unsalted Butter | Creates flaky layers | Vegetable shortening (crispier, less flavor) |
| Cornstarch | Thickens fruit juice | Tapioca starch (clearer gloss) |
Tools for the Job
You don't need a kitchen full of gadgets, but a few things make this easier. A food processor is a huge help for the crust because it keeps the butter cold by minimizing hand contact. If you don't have one, a pastry blender works, but you'll need to move fast.
A 9 inch pie plate is the standard here. Glass or ceramic works best for heat distribution. I also recommend using parchment paper when rolling out your dough. It makes transferring the circle into the pan a breeze and prevents the dough from sticking to the counter.
Right then, make sure you have a sharp paring knife or a cherry pitter. Pitting 900g of cherries by hand is a bit of a chore, but the flavor of fresh fruit is worth the effort. According to USDA FoodData, cherries are packed with antioxidants that keep their profile better when fresh.
Step by step Baking
Phase 1: Creating the Shattering Crust
- Combine flour, sugar, and salt in a food processor. Pulse 3-5 times to integrate.
- Add chilled butter cubes. Pulse until the mixture resembles coarse crumbs with some pea sized lumps remaining. Note: Those lumps are what make the crust flaky
- Add ice water 1 tablespoon at a time, pulsing after each addition, until the dough just begins to clump together.
- Divide dough into two discs, wrap in plastic, and refrigerate for at least 2 hours.
Phase 2: Crafting the Fresh Cherry Pie Filling
- In a large bowl, toss the halved cherries with lemon juice and vanilla extract.
- Whisk together sugar, cornstarch, and cinnamon in a small bowl, then fold into the cherries.
- Let the filling mixture sit for 15 minutes to allow the cornstarch to hydrate.
Phase 3: Assembly and Baking
- On floured parchment, roll the first disc into a 12 inch circle. Ease it into the pie plate, pressing firmly against the bottom and sides.
- Pour the cherry mixture into the crust and dot the top with the cubed butter.
- Roll the second disc. Cut into 1 inch strips and weave a classic lattice pattern across the top. Trim and crimp the edges to seal.
- Brush the crust with beaten egg and water, then sprinkle with sparkling sugar.
- Bake at 400°F (200°C) for 20 minutes, then reduce heat to 375°F (190°C) and bake for another 30 minutes until mahogany colored and bubbling.
Chef's Note: If the edges of the crust start to brown too quickly during the first 20 minutes, cover them with a pie shield or strips of foil. This prevents them from burning while the center finishes.
Fixing Common Pie Issues
One of the biggest frustrations with a Fresh Cherry Pie with Homemade Crust is the dreaded "soggy bottom." This usually happens when the oven temperature is too low or the butter in the crust has melted before the pie even hits the oven.
Troubleshooting Common Issues
| Issue | Solution |
|---|---|
| Why Your Filling Is Runny | If the filling doesn't set, you likely had too much fruit juice or didn't let the cornstarch hydrate. Next time, ensure you don't skip the 15 minute rest. |
| Why Your Edges Burnt | The edges are closer to the heat and have less filling to absorb the energy. Use a pie shield or foil. Also, check that your oven rack is in the center position. |
| Why Your Crust Is Tough | Over working the dough develops too much gluten. If you pulse the food processor for too long, the dough becomes a paste instead of a crumbly mix. Keep those butter lumps visible. |
Adjusting the Recipe Size
When scaling this recipe, remember that baking is more about ratios than simple multiplication. If you're making a smaller pie, don't just halve everything and keep the time the same.
Scaling Down (1/2 batch): Use a 6 inch pie pan. Reduce the baking time by about 20%. If the recipe calls for one egg for the wash, beat it in a cup and use half.
Scaling Up (2x batch): Work in batches for the dough. If you try to put too much flour and butter in a small food processor, it won't integrate evenly. For the filling, increase salt and cinnamon by only 1.5x to avoid overpowering the cherries.
If baking two pies at once, lower the temperature by 10°C (25°F) and extend the time by 10 minutes to allow for the extra moisture in the oven.
Pie Baking Myths
Searing the bottom of the crust with a torch does not "seal" the dough. While it might add color, the actual seal happens during the initial over high heat blast of the oven.
Some people think you must blind bake every fruit pie. For this Fresh Cherry Pie with Homemade Crust, it's not necessary as long as you use the two stage temperature method. The high starting heat cooks the bottom crust before the juices can soak in.
Another myth is that you need room temperature butter for a "smooth" dough. In pastry, smooth is the enemy. You want a chunky, cold mixture to ensure the crust isn't dense.
Storage and Reheating Tips
Keep your pie in a cool place for about 2 hours before slicing. If you cut it while it's hot, the filling will run. Once cooled, it stays fresh on the counter for 2 days or in the fridge for up to 5 days.
For the freezer, slice the pie first. Wrap each slice individually in plastic wrap and then foil. They'll last 3 months. To reheat, avoid the microwave, as it makes the crust chewy.
Instead, put a slice in the oven at 175°C (350°F) for 10 minutes until the crust crisps back up.
To avoid waste, use any leftover cherry pits for a homemade cherry pit syrup or compost them. If you have extra dough scraps, roll them into small discs, sprinkle with cinnamon sugar, and bake them for 8 minutes as a quick snack.
Cherry Pie Flavor Twists
If you want to switch things up, try adding 1/2 teaspoon of almond extract to the filling. Almond and cherry are a match made in heaven and add a deep, nutty note.
For a more complex flavor, replace 2 tablespoons of the granulated sugar with brown sugar. This gives the filling a slight caramel undertone. If you're feeling adventurous, try a "savory" twist by adding a pinch of cardamom instead of cinnamon.
If you're serving this at a party, it pairs great with other baked goods. I usually put out a plate of Classic Homemade Cookies alongside the pie for a full dessert spread.
Serving Your Fresh Pie
The best way to serve a Fresh Cherry Pie with Homemade Crust is slightly warm with a scoop of vanilla bean ice cream. The cold cream cuts through the tartness of the cherries and the richness of the butter.
For a more refined look, use a sharp serrated knife to cut clean slices. If the filling is perfectly set, the slice should stand up on its own without leaning.
If you have leftovers, try serving a cold slice for breakfast with a dollop of Greek yogurt. It sounds strange, but the acidity of the yogurt mimics a cheesecake pairing. Trust me, it's a great way to use up that last piece of pie.
Recipe FAQs
What's the best recipe for cherry pie crust?
Pulse flour, sugar, and salt in a food processor, then add chilled butter cubes. Process until coarse crumbs form, stir in ice water until the dough clumps, and refrigerate for 2 hours before rolling.
How to make cherry pie filling taste better?
Toss cherries with lemon juice, vanilla extract, and cinnamon. This balance of acidity and warmth elevates the fruit; if you love this flavor profile, see our cherry ice cream.
How sweet is cherry pie?
Moderately sweet with a tart finish. The granulated sugar is offset by the natural acidity of fresh cherries and the addition of lemon juice.
Why did my cherry pie turn out runny?
You likely skipped the 15-minute rest for the filling. This resting period is essential for the cornstarch to hydrate and properly thicken the fruit juices during baking.
How to bake a cherry pie?
Bake at 400°F for 20 minutes, then reduce heat to 375°F for 30 minutes. The pie is finished when the crust is mahogany colored and the filling is bubbling.
How many cherries go in cherry pie?
Use 6 cups of pitted and halved fresh cherries. This amount ensures a dense, fruit heavy filling for a standard 9 inch pie plate.
How to make store bought pie fillings taste homemade?
Stir in fresh lemon juice and vanilla extract. These additions cut through the processed sweetness and provide the bright, aromatic notes found in scratch made fillings.
Fresh Cherry Pie Homemade Crust

