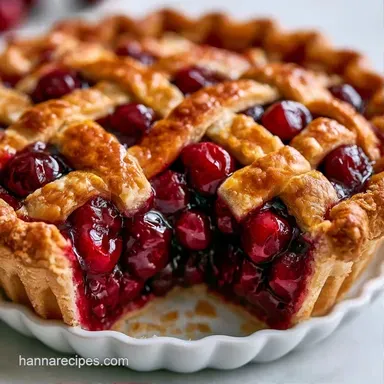
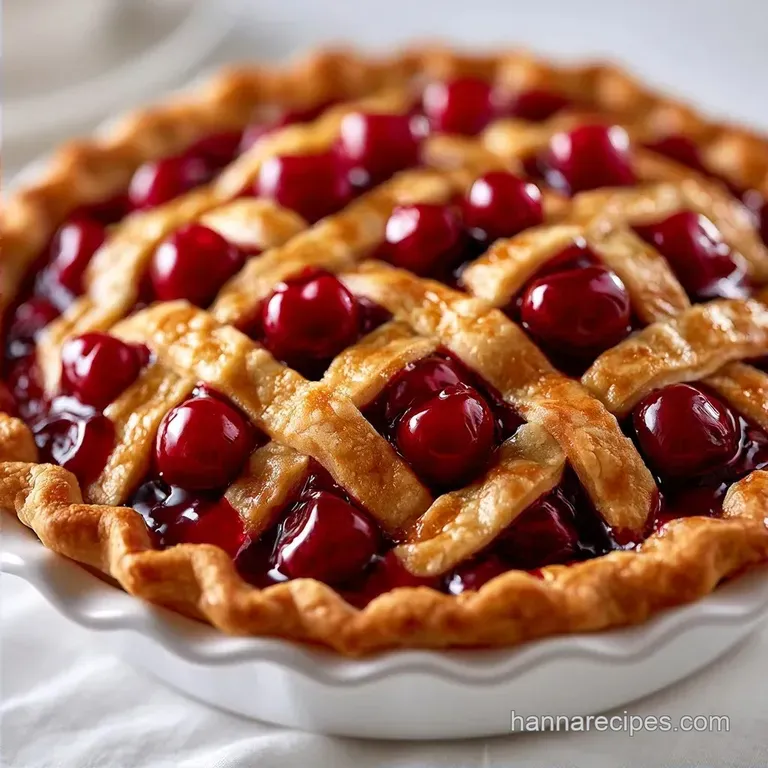
Easy Cherry Pie: Buttery and Tart
- Time: 30 min active + 1 hour chilling
- Flavor/Texture Hook: Flaky, buttery crust with a bubbling, tart center
- Perfect for: Family Sunday dinners or holiday gatherings
- Why This Pie Works
- Quick Recipe Specifications
- The Ingredient Lineup
- Essential Baking Tools
- Steps for a Great Bake
- Solving Common Pie Problems
- Troubleshooting Common Issues
- Customizing Your Fruit Pie
- Adjusting for More People
- Pie Myths Debunked
- Storage and Prep Tips
- Ways to Serve It
- Recipe FAQs
- 📝 Recipe Card
The smell of bubbling cherries and warm almond hits you the second you open the oven door. It's that specific, nostalgic aroma that makes a house feel like a home, especially when the crust is just turning a deep gold.
I remember making this for a family reunion where the tension was high, but one slice of warm pie seemed to settle everyone down.
There is something about the contrast of a crisp, salty crust and the bright, acidic punch of cherries that just works. This Easy Cherry Pie Recipe doesn't rely on pre made fillers or artificial thickeners. Instead, it uses a precise ratio of cornstarch and lemon juice to keep the filling stable.
You can expect a pie that holds its shape when sliced but remains juicy. Whether you're using fresh, frozen, or canned fruit, the method remains the same. We're focusing on temperature control and hydration to get those flaky layers.
Why This Pie Works
Baking is essentially a chemistry experiment you can eat. The success of this Easy Cherry Pie Recipe comes down to how we handle the fats and the starches.
- Cold Fat Pockets: By keeping the butter chilled, we create tiny clumps of fat in the dough. When these hit the oven, they melt and release steam, which pushes the flour layers apart.
- Starch Hydration: Letting the cherries sit with the cornstarch for 15 minutes allows the starch to absorb the juices. This ensures the filling thickens evenly rather than separating into a layer of syrup and fruit.
- Acid Balance: The lemon juice doesn't just add brightness. It helps break down the pectin in the fruit slightly, resulting in a more consistent texture. If you really want a jammy consistency, my Pie with Thick Filling recipe uses a slightly different ratio.
- Butter Temp
- Keep butter at 40°F (4°C) before cubing.
- Flour Mass
- Use exactly 315g of all purpose flour for the crust.
- Internal Temp
- The filling is set when it reaches 200°F (93°C).
| Method | Time | Texture | Best For |
|---|---|---|---|
| Oven Bake | 45 mins | Integrated & Flaky | Traditional slices |
| Stovetop Filling | 15 mins | Jammy & Thick | Tarts or quick desserts |
Quick Recipe Specifications
This Easy Cherry Pie Recipe is designed for a standard 9 inch deep dish plate. The ratios ensure the crust can support the weight of nearly a kilo of cherries without collapsing.
- Fruit to Starch
- Roughly 28:1 ratio of cherries to cornstarch.
- Flour to Fat
- Approximately 1.4:1 ratio for a sturdy yet tender crust.
- Hydration
- 6-8 tbsp of water, added incrementally to avoid a gummy dough.
The Ingredient Lineup
For the best results, I recommend using high protein flour from King Arthur Baking to give the crust more structure.
For the Flaky Butter Pie Crust 2 ½ cups (315g) all purpose flour Why this? Provides the necessary gluten for structure 1 cup (225g) unsalted butter, chilled and cubed Why this? Creates steam pockets for flakiness 1 tsp (6g)
Granulated sugar 1 tsp (6g) salt 6 8 tbsp (90 120ml) ice water Why this? Keeps the butter from melting during mixing
For the Old Fashioned Cherry Filling 6 cups (900g) pitted cherries Why this? Fresh or frozen provide the best tartness ¾ cup (150g) granulated sugar ¼ cup (32g) cornstarch Why this? Thickens the juices into a gel 1 tbsp
(15ml) lemon juice 1 tsp (5ml) vanilla extract ½ tsp (2.5ml) almond extract Why this? Enhances the natural cherry flavor ¼ tsp (1.5g) salt
For the Golden Glaze 1 large egg 1 tbsp (15ml) milk 1 tbsp (12g) coarse sugar
| Original Ingredient | Substitute | Why It Works |
|---|---|---|
| Unsalted Butter | Vegan Butter Sticks | Similar fat content. Note: Use brands that are firm when cold |
| Cornstarch | Arrowroot Powder | Similar thickening. Note: Use 1:1 ratio but may be less stable |
| Fresh Cherries | Frozen Cherries | Same flavor. Note: Thaw and drain slightly first |
| All Purpose Flour | gluten-free 1:1 Blend | Mimics structure. Note: Crust will be more fragile |
Essential Baking Tools
You don't need a professional kitchen for this Easy Cherry Pie Recipe, but a few specific tools make it easier.
- 9 inch Deep Dish Pie Plate: Essential for containing the 6 cups of fruit.
- Pastry Cutter or Forks: For cutting butter into flour without heating it up with your hands.
- Rolling Pin: To get an even 12 inch circle.
- Pastry Brush: For applying the egg wash.
Steps for a Great Bake
Follow these steps carefully. The timing is key, especially the resting period for the filling.
- Toss the pitted cherries with sugar, cornstarch, lemon juice, vanilla, and almond extract in a large bowl. Note: Let this sit for 15 minutes so the sugar can draw out the juices.
- Roll out the first dough disc on a floured surface to 12 inches. Gently press it into the pie plate, leaving a slight overhang.
- Roll out the second disc of dough and cut it into strips of equal width.
- Weave the strips across the cherry filling to create a lattice top.
- Trim the edges, fold the bottom crust over the top, and crimp with your fingers or a fork to seal.
- Whisk together the egg and milk. Brush this over the crust and sprinkle with coarse sugar.
- Bake at 375°F (190°C) for 45 minutes until the crust is golden brown and the filling is bubbling.
Chef's Tip: If the edges of the crust brown too quickly, cover them with a strip of foil after 20 minutes. This prevents them from burning while the center finishes.
Solving Common Pie Problems

Even with a precise Easy Cherry Pie Recipe, things can happen. Most issues stem from temperature or moisture.
Troubleshooting Common Issues
| Issue | Solution |
|---|---|
| Why Your Crust Is Tough | Toughness happens when you overwork the dough. This develops too much gluten, turning a flaky crust into a bread like one. Stop mixing the second the dough holds together. |
| Why Your Filling Is Runny | This usually happens if the cherries weren't allowed to hydrate with the starch or if the pie was sliced too hot. Cornstarch needs to reach a specific temperature to "set." |
| Why the Bottom Is Soggy | A "soggy bottom" occurs when the fruit juices soak into the bottom crust before it can bake. Baking on the lowest oven rack helps heat the bottom plate faster. |
Customizing Your Fruit Pie
This Easy Cherry Pie Recipe is a great base, but you can tweak it to fit your taste. I've found a few variations that work consistently.
The Tart Twist If you prefer a more acidic profile, replace 1 cup of sweet cherries with sour cherries. You can also increase the lemon juice by one teaspoon to brighten the overall flavor.
Using Canned Filling If you're in a rush, you can use store-bought filling. However, canned versions are often too sweet. I suggest adding a pinch of salt and a splash of lemon juice to the canned filling to balance the sugar.
Gluten-free Adjustments When using a GF blend, the dough lacks the elasticity of wheat. Roll the dough between two sheets of parchment paper to prevent it from sticking and tearing.
Decision Shortcut Want a thicker crust? Use 1/4 cup extra flour. Want a tarter pie? Add an extra tsp of lemon juice. Want it sweeter? Increase sugar by 2 tbsp.
Adjusting for More People
Scaling an Easy Cherry Pie Recipe requires a bit of care, especially with the crust.
Scaling Down (Half Batch) Use a 6 inch pie pan. Reduce the baking time by about 20%, but keep the temperature the same. For the egg wash, beat one egg and use only half of it.
Scaling Up (Double Batch) Do not try to make one giant pie. Instead, make two separate 9 inch pies. When doubling the crust, work in batches so the butter doesn't warm up while you're rolling the second one.
Baking Adjustments If baking two pies at once, lower the temperature by 25°F (to 350°F) and extend the time by 10-15 minutes. This ensures the air circulates and both pies brown evenly.
Pie Myths Debunked
There are a few things people say about this Easy Cherry Pie Recipe that just aren't true.
Myth: You must use fresh cherries for the best taste. Actually, frozen cherries are often picked at peak ripeness and flash frozen. They work just as well as fresh, provided you thaw them and drain some of the excess liquid.
Myth: Adding more cornstarch always fixes a runny pie. Too much starch makes the filling gummy and opaque. It loses that beautiful, glossy look and tastes like paste. Stick to the 1/4 cup measurement.
Storage and Prep Tips
Getting the timing right for this Easy Cherry Pie Recipe can be tricky. Here is how to handle the leftovers.
Refrigeration and Freezing Keep the pie in the fridge for up to 5 days. For longer storage, you can freeze the unbaked pie. Wrap the crust and filling tightly in plastic wrap and foil. Bake it directly from frozen, adding about 15 minutes to the cook time.
Reheating Avoid the microwave, as it makes the crust rubbery. Instead, put a slice in a 350°F (175°C) oven for 10 minutes. It brings back the crispness of the butter.
Zero Waste Tips Don't throw away the cherry pits if you have a lot of them. You can actually dry them and steep them in hot water for a subtle, almond like tea. Also, any leftover dough scraps can be rolled into small coins, sprinkled with cinnamon sugar, and baked as mini cookies.
Ways to Serve It
The final touch on an Easy Cherry Pie Recipe is all about contrast. Since the pie is rich and tart, you want something creamy to balance it.
The Classic Contrast A scoop of vanilla bean ice cream is the standard for a reason. The cold cream cuts through the acidity of the cherries. For a more intense version, try it with cherry vanilla ice cream.
The Savory Twist Some people enjoy a tiny pinch of flaky sea salt on top of the slice. It pulls out the buttery notes of the crust and makes the fruit taste sweeter without adding more sugar.
The Afternoon Tea Style Serve a cold slice with a dollop of unsweetened whipped cream and a cup of strong black tea. The bitterness of the tea balances the sweetness of the filling.
Whether you're making this for a crowd or just for yourself, this Easy Cherry Pie Recipe delivers a result that feels special but stays simple. It's all about respecting the temperature of your butter and giving the fruit time to settle. Grab your rolling pin and get started.
Recipe FAQs
How to bake a cherry pie?
Bake for 45 minutes until the crust is golden brown and the filling is bubbling. Use an egg and milk glaze to achieve a professional shine.
Why did my cherry pie turn out runny?
The cornstarch likely didn't set. This happens if the cherries didn't hydrate for 15 minutes before baking or if the pie was sliced while too hot.
Can I use canned cherries instead of fresh?
Yes, but drain them thoroughly. Canned fruit contains excess syrup that can make the bottom crust soggy if not removed.
Should you prebake the bottom crust of a cherry pie?
No, it isn't necessary. The 45-minute bake time is sufficient to cook the bottom crust completely as long as the filling is thickened.
How to make cherry pie filling taste better?
Add almond and vanilla extracts. These extracts deepen the fruit's natural flavor and provide a complex, bakery style taste.
How many cherries go in cherry pie?
Use 6 cups of pitted cherries. This volume fills a 9 inch deep dish pie plate perfectly without overflowing.
How to make a quick cherry pie?
Prepare the filling and crust simultaneously. While the cherries hydrate for 15 minutes, roll out your dough. If you enjoy this efficiency, see how we optimize timing in our easy cookies.
Easy Cherry Pie Recipe